Tuesday, 13 October 2015

Exam 70-486 Objective 3.3 Design and implement MVC controllers and actions: Apply authorization attributes

Attributes are based on the System.Web.Mvc.FilterAttribute class.

Their primary purpose is to analyse information coming into the controller, especially HttpContext, and determine if it meets certain criteria
=> basically perform some logic before and/or after an action method is executed.

MVC Framework support five different types of filters:

The ActionFilterAttribute class implements both the IActionFilter and IResultFilter interfaces.
·         This class is abstract, which forces you to provide an implementation.

The AuthorizeAttribute and HandleErrorAttribute classes contain useful features and can be used without creating a derived class.

In order for a .Net class to be treated as an MVC filter, it must implement IMvcFilter – you can do this directly or derive from FilterAttribute class.

To implement a custom Authorization Filter

Derive from AuthorizeAttribute and override the AuthorizeCore method:

    public class AuthorizeFilterAttribute : AuthorizeAttribute
    {
        protected override bool AuthorizeCore(HttpContextBase httpContext)
        {
            // Logic here
            return true;
        }
    }

Some devs will implement IAuthorizationFilter themselves in order to gain access to the AuthorizationContext (contains more info like routing data and which controller/action is being called).

This is not recommended because:

  • Best not to include controller/action specific logic in the Authorization filter
    • Doing so breaks the seperation of concerns and causes testing problems
  • Keep it simple; let the context of what is being authorized come from where the attribute is applied.
  • Put global authorization concerns in the Authorization filter; e.g. a request from a certain domain should always be denied
    • Keep the security checks as close as possible to the resource being secured -> this way no matter how the user got to the resource, there will always be a security check.

Using the built-in Authorization Filter

Can provide an authorization policy by specifying two public properties: Users and Roles
[Authorize(Users = "admin, spoc", Roles = "Manager, DeckHand")]
    public class AccountController : Controller
This will authorize users admin and spoc to access the Account controller, as long as they are in at least one of the Roles Manager or DeckHand.
Note that there is an implicit restriction here that the above users must be authenticated.
=> if no Users or Roles are specified, then any User, in any Role can access the controller.
If the filter denies the request, the MVC framework will return a 401 Not Authorized response, which is then internally converted to a 302 redirect to the login page and the browser will respond to this by prompting the user for credentials.
The 401 to 302 conversion is handled by Open Web Interface for .Net (OWIN) components.
In previous versions; this redirect was handled by defining a loginUrl in the <authentication> element of web.config.

SECURITY WARNING: If you ever attempt to write your own Account controller, be aware of the risk of Open Redirection Attacks that arise due to the 401 to 302 redirection process.
Friday, 8 May 2015

Error loading PostSharp symbol file

The solution was found here:


I am repeating on my blog simply for redundancy purposes because the above article was the only source I found to the problem.

If you get the following Build error:

Error loading PostSharp symbol file: Access to the path 'C:\..\SomeFile.pssym' is denied.


Likely cause: you deleted solution binaries in order to clear out lingering out-of-date assemblies. Unfortunately, the PostSharp process becomes confused and prevents you from building the model assembly.
Workaround: Close and re-open the solution.

Thursday, 15 January 2015

[I WISH] Getting started with Azure WebJobs and Storage Emulator

I've written this post to bring together all the various resources I used to get a Azure WebJob built which utilized the Azure Storage Emulator.

1. Make sure you the have Azure SDK installed, which should install the Azure Storage Emulator (amoungst many other things including Visual Studio 2013 Express for Web if you've not already got VS2013) - see here:

http://go.microsoft.com/fwlink/?linkid=324322&clcid=0x409

2. Download teh complete solution of the 'Get started with the Azure WebJobs SDK' tutorial:

http://code.msdn.microsoft.com/Simple-Azure-Website-with-b4391eeb

3. Open up the solution and build it - this should restore all the packages. If it doesn't restore them manually by going to the Manage NuGet Packages for Solution dialog and clicking the Restore button at the top right.

4. Configure the ContosoAdsWeb project to use Emulated Storage:
- Open the web.config file of the ContosoAdsWeb project
- Add another connection string like:

<add name="EmulatedStorage" connectionString="UseDevelopmentStorage=true" />

5. In global.asax.cs, set the storageAccount variable to use the 'EmulatedStorage' connection string like this:

var storageAccount = CloudStorageAccount.Parse
                (ConfigurationManager.ConnectionStrings["EmulatedStorage"].ToString());

6. Configure teh ContosoAdsWebJob project to user Emulated Storage:
- Open the app.config of the ContosoAdsWebJob project
- Comment out the existing connection strings and add the following:


    <add name="AzureWebJobsDashboard" connectionString="UseDevelopmentStorage=true"/>
    <add name="AzureWebJobsStorage" connectionString="UseDevelopmentStorage=true"/>

**** It was at this point I got an exception stating that Storage Emulator is not supported with WebJobs ****

Thursday, 4 December 2014

Cannot turn on .Net 3.5 in Windows 8.1 Error Code: 0x800F0906

I was trying to install SQL Server Express 2014 on a Windows 8.1 box and got the error:

"Error while enabling Windows Feature: NetFx3, Error Code: -2146498298 ... "

Which basically means it failed to turn on .Net 3.5.

So I tried to do it manually via the Control Panel and was fronted with the error:

"Windows couldn't connecto to the internet to download the necessary files. Makes ure that you're connected to the internet and click 'Retry' to try again.

Error code: 0x800F0906"

Not a helpful message (as internet was connected) but a helpful error code.

After hours of googling around, I found two good resources:

1. This page explains a couple of options for fixing the error - none of which worked for me but has worked for others:

http://community.spiceworks.com/how_to/show/30581-install-net-3-5-on-windows-8

2. A Windows Update page which tells you to run the following update - which in turn removes two other updates from your computer:

https://support.microsoft.com/kb/3005628

Running this update didn't seem to remove updates 2966827 or 2966828 - so I removed them myself via the procedure:

1. Control panel > 'View installed updates' (on the left hand menu)
2. Search for KB2966827, select and uninstall
3. Search for KB2966828, select and uninstall

Once I did that, I was able to successfully turn on .Net 3.5 via the 'Turn Windows features on or off' dialog in the Control Panel > Programs and Features section.

And THEN I was able to install SQL Server Express *finally*...

Friday, 7 November 2014

I want to help in the Ebola crisis - but how?

I am writing this post for both myself and others as a reference dictating how I went about choosing which charities to support in order to combat the outbreak of Ebola.

An initial quick Google revealed a website by the Centre for International Disaster Information - whose focus is on effective public donations to international crisis situations.

They present this list of organisations that are working in West Africa against Ebola:

http://www.cidi.org/ebola-ngos/#.VF1NIPmUeUA

Another quick Google found a site that was focussed on assessing charities use of donations - with a rating scheme comparing similar charities against one another - a fantastic tool to ensure that your donation is being spent wisely!

www.charitynavigator.org

I then chose the following charities from the list and ensured that they each put at least 90% of the funds they recieved back into their programs.

Direct Relief - http://www.directrelief.org/
These guys are focussed on getting urgent supplies into the heart of the crisis.
It is worth mentioning that in the past financial year, Direct Relief put a massive 99% of their funds back into their programs!

Africare - http://www.africare.org/how-you-can-help/africare-ebola-outbreak-relief/
Well established organisation that has been on the ground in Africa helping with many things for a long time...

and

International Medical Corps - https://internationalmedicalcorps.org/ebola#.VF1bbfmUeUA
Focussed on various things including treatment of patients as well as training staff and doctors.


Saturday, 6 September 2014

Generic Repository pattern - or not?

I've often wondered if one should really be using Generic Repositories or not...

And from my research it seems like the answer is the same as to many other programming questions: it depends on the context of the problem you're trying to solve.

Instead of repeating other well put together discussions, here are some links to some of the more poignant opinions that I use to assist in determining if a generic repository is appropriate or not:

Say No to the Repository Pattern in your DAL

Repositories On Top UnitOfWork Are Not a Good Idea

and

The generic repository is just a lazy anti-pattern

The thing i like about the last link is that it gives a small example of when a generic repository can useful:

A generic repository does have a place, but as a helper for internal access used within a public-facing repository implementation. The trick is not to expose a generic interface but achieve re-use through composition.

Friday, 4 July 2014

How to develop a data-driven EPiServer 7.5 BlockType Add-On with ASP.Net Web API

Prerequisites:

  1. This post assumes you have setup a Test EPiServer site onto which you will install your Data Driven Add-On and that that test site resides in the same solution as the Add-On you're about to develop. I have written another post explaining how to setup such a test site:
    How to setup a EpiServer 7.5 Add-On Development Environment
  2. The nuget.exe command line tool installed and its installtion location is in your 'PATH' environment variable
  3. Visual Studio 2013 installed
  4. EPiServer Visual Studio Extensions are installed


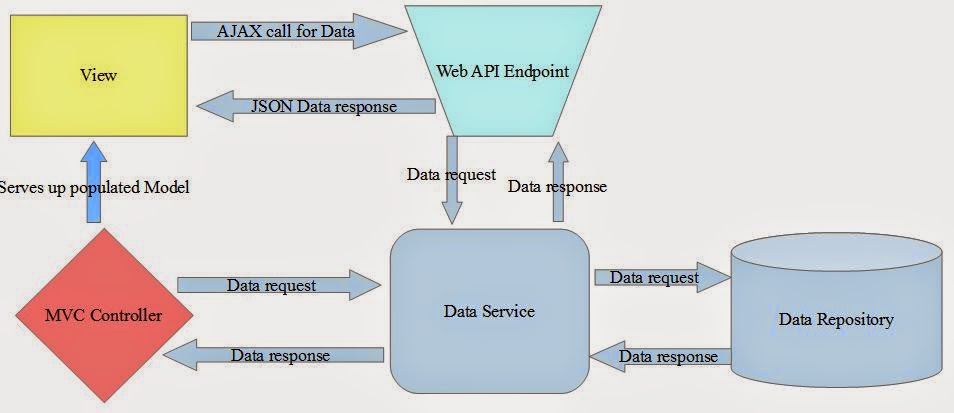
In this post we are going to develop a basic data-driven EPiServer 7.5 Add-On.

The Add-On will have the following architecture:


The service in this example will simply return some hard coded data from an in-memory repository. In a real application, this would return dynamic data via connection to a database or third party service or what ever source you like really - just plug it in.

To develop such an Add-On, follow these steps in Visual Studio 2013:


  1. Add a New Project > ASP.Net Web Application
    • Name your project the something appropriate like 'MyDataBlockAddOn'
  2. Select 'Empty' in the 'New ASP.Net Project' dialog
    • Tick the 'Web API' box to include folders and core references for ASP.Net Web API
  3. To keep the installation foot print of your Add On minimal and relevant, delete the following from the AddOn project:
    1. Web.config (including .Debug and .Release transformation files)
    2. Global.asax
    3. App_Data and App_Start folders (and all their contents)
  4. Should now just be left with folders 'Controllers' and 'Models' and a 'packages.config' file.
  5. To enable the development of EPiServer Add-Ons, the AddOn project needs to reference some EPiServer DLLs.
    • You can either:
    1. Use NuGet to include the required Packages/DLLs
      • Assuming you have a target EPiServer Website setup already in your solution (as per my post How to setup a EpiServer 7.5 Add-On Development Environment), then you should be able to reference the required packages from a solution level.
      • It is advisable to make sure you have the latest EPiServer packages:
        1. Right click the Solution in VS > Manauge NuGet Packages For Solution > Updates > EPiServer Feed > Update All
        2. If you don't see the EPiServer Feed, select 'All' under Updates and just selectively update all the EPiServer packages
        3. Right click the Solution in VS > Manage NuGet Packages For Solution
        4. Find the following packages and add them to your Add-On project:
          • EPiServer.Framework
          • EPiServer.CMS.Core
        5. NOTE: Doing this may result in two versions of the same package being installed in your solution e.g MVC 4 will be used by the EPiServer Test Site while your AddOn maybe using MVC 5. I have found it is best to leave this as is, and simply add Assembly 
          OR

    1. Reference them directly:
      • Open your Solution folder in Windows Explorer
      • Create a 'lib' folder and add the following EPiServer DLLs (you can copy them from any EPiServer site setup via the Visual Studio EPiServer Extenstion templates)
        • EPiServer.BaseLibrary
        • EPiServer.Data
        • EPiServer
        • EPiServer.Shell
  1. Now add your Model, which for this example will be a derivative of the EPiServer BlockType class:
    • Add a new class to the 'Models' folder, give an appropriate name e.g. 'MyDataBlockType'
    • Make sure class derives from 'EPiServer.Core.BlockData'
    • Decorate the class with the 'ContentType' attribute, ensuring it has at least a new GUID:
      [ContentType(GUID = "NEW-GUID-HERE")]
    • There is also a short cut to create this class via an EPiServer template:
      • Right-click the 'Models' folder > New Item > 'EPiServer' > 'BlockType'
    • Since my example is concerned only with the data returned by the Service via a Web API endpoint, my BlockType will not have any CMS properties i.e. the BlockType will not serve up any content from the CMS.
    • If you want your Add-On to return both CMS content and Service data then add what ever properties you need to your BlockType class. You can see an example of this in my other post How to develop a simple EPiServer 7.5 MVC BlockType Add-On
  2. Add a BlockType MVC Controller:
  3. Add a view for your BlockType which will contain JavaScript to call a Web API endpoint to retrieve data from a Service and populate a list with that data:
    • Add a new folder to the solution called 'Views'
    • Add a new folder to the 'Views' folder, named the same as your Model class
      e.g. 'MyDataBlockType'
    • Add a new Partial View, named the same as your Model class
      e.g. 'MyDataBlockType.cshtml':
    • This view simply renders an empty Unordered List element, then calls the Web API endpoint (which we'll set-up in the next steps below) and populates the list element using the JSON data returned from the AJAX call.
  4. Add a Data Transfer Object (DTO) to encapsulate the Service data you want to expose via the Web API.
    • NOTE: This DTO has nothing to do with the target sites content data, and exists independently of the concept of the EPiServer CMS - imagine its data coming from a third party service, such as Car Specification data for example.
    • Add a new folder to the AddOn project called 'Dtos'
    • Add a class to the 'Dtos' folder with the same name as your Add-On, with a 'Dto' suffix
      e.g. 'MyDataDto':
  5. Add a Service to expose data
    • Add a new folder to the AddOn project called 'Services'
    • Add a class to the 'Services' folder with an appropriate name for your Service class
      e.g. 'MyDataService':
  6. Add a Web API Controller
    • Add a new folder to the AddOn project called 'ApiControllers'
    • Add a new Empty Web API Controller to 'ApiControllers' with the same name as your Add-On but with a 'ApiController' suffix
      e.g. 'MyDataBlockTypeApiController.cs':
  7. Package your AddOn and install it
  8. Add Web API to the Target Site
    • Your target EPiServer site will need to have ASP.Net Web API installed in order for your Add-On to work - since your Add-On already has the right Web API packages installed, assuming the Solution and target site are in the same solution, you can:
      • Right click the Solution > Manage NuGet Packages for Solution
      • Find 'Microsoft AspNet Web Api Core Libraries'
        and 'Microsoft AspNet Web Api WebHost'
      • Install them in the target site project
    • Target site will also need to register the Web API routes.
      • Add the following line to the Global.asax.cs file in the target site:
        GlobalConfiguration.Configure(WebApiConfig.Register);
      • Add the following file, called 'WebApiConfig.cs' to the 'App_Start' folder of the target site:
  9. If everything went according to plan, you should now be able to create a new Block of your Add-On type e.g. MyDataBlockType and then add it to a page. Once you've done that the page should render out three items in a list like this (one item for each item in the list returned from the AJAX call to the Web API controller and in turn a call to the data service):
    • Sizzler: true
    • Gravitron: true
    • Magnata: true